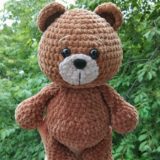
Tiny bear and bunny amigurumi

With this free crochet pattern you can make tiny amigurumi animals: a bunny or a bear. Both animal dolls make lovely gifts for little kids or babies. The amigurumi bear is just about 8 cm (3.1″) tall, the bunny is about 10 cm (3.9″) tall with ears.
Designed and photos by @scandistyle_dolls
Materials:
- Yarn: Vita Brilliant (45% wool, 55% acrylic, 380 m/100 g)
- Hook size: 1.5-1.75 mm
- Iris YarnArt yarn (138 m/20 g) black and white for eyes or you can use 4 mm safety eyes
- Sewing needle and scissors
- Fiberfill
Abbreviations:
R = row
MR = magic ring
ch = chain
sc = single crochet
dc = double crochet
hdc = half double crochet
inc = 2 sc in the next stitch
dec = single crochet 2 stitches together
F.o. = finish off
(12) = number of stitches you should have at the end of the round/row
(…)*6 = repeat whatever is between the brackets the number of times stated
Free crochet bear pattern

Head
R 1: 6 sc in MR
R 2: (inc)*6 (12)
R 3: (1 sc, inc)*6 (18)
R 4: (2 sc, inc)*6 (24)
R 5: (3 sc, inc)*6 (30)
R 6-11: 30 sc (6 rows)
R 12: (3 sc, dec)*6 (24)
R 13: (2 sc, dec)*6 (18)
R 14: (1 sc, dec)*6 (12)
Fasten thread, cut and hide inside. Stuff.
Ears (make 2)
In turning rows:
R 1: 6 sc in MR, ch, turn
R 2: (1 sc, inc)*3 (9), ch, turn
R 3: 9 sc
Leave thread for sewing.
Body
R 1: 6 sc in MR
R 2: (inc)*6 (12)
R 3: (1 sc, inc)*6 (18)
R 4: (2 sc, inc)*6 (24)
R 5-7: 24 sc (3 rows)
R 8: 6 dec, (1 sc, dec)*4 (14)
R 9-11: 14 sc (3 rows)
R 12: (5 sc, dec)*2 (12)
R 13: 12 sc
Leave thread for sewing. Stuff.

Muzzle
R 1: 6 sc in MR
R 2: (1 sc, inc)*3 (9)
R 3: 9 sc, sl st
Leave thread for sewing. Stuff when sewing.
Legs (make 2)
R 1: 6 sc in MR
R 2: (inc)*6 (12)
R 3-5: 12 sc (3 rows)
R 6: (2 sc, dec)*3 (9)
R 7-10: 9 sc (4 rows)
Stuff.
Pull the opening, fasten thread and hide inside.
Arms (make 2)
R 1: 6 sc in MR
R 2: (1 sc, inc)*3 (9)
R 3-4: 9 sc (2 rows)
R 5: (1 sc, dec)*3 (6)
R 6-7: 6 sc (2 rows)
Stuff.
Pull the opening, fasten thread and hide inside.

Tail
R 1: 6 sc in MR
R 2: (inc)*6 (12)
R 3: 12 sc
R 4: (dec)*6 (6)
Leave thread for sewing. Stuff when sewing.
Assembly
1. Sew the ears on 2-4 rows on sides of the head.
2. Sew the muzzle on 10-12 rows, embroider nose and smile on the muzzle.
3. Embroider/ glue/ sew eyes on 9th row, there are 5 sc between the eyes.
4. Sew the head to the body.
5. Attach legs using thread attaching (or sew) between 4th and 5th rows of the body on the sides.
6. Attach arms using thread attaching (or sew) 1 row below the seam between head and body.
7. Sew the tail on the back of the toy on about 5-6 rows.
Free crochet bunny pattern

Head
R 1: 6 sc in MR
R 2: (inc)*6 (12)
R 3: (1 sc, inc)*6 (18)
R 4: (2 sc, inc)*6 (24)
R 5: (3 sc, inc)*6 (30)
R 6-11: 30 sc (6 rows)
R 12: (3 sc, dec)*6 (24)
R 13: (2 sc, dec)*6 (18)
R 14: (1 sc, dec)*6 (12)
Fasten thread, cut and hide inside. Stuff.
Ears (make 2)
R 1: 10 ch, from 2nd ch from hook: 5 sc, 3 hdc, 6 dc in last st, turn and crochet on the opposite side of the chain: 3 hdc, 5 sc
R 2: 23 sc
Leave thread for sewing.
Body
R 1: 6 sc in MR
R 2: (inc)*6 (12)
R 3: (1 sc, inc)*6 (18)
R 4: (2 sc, inc)*6 (24)
R 5-7: 24 sc (3 rows)
R 8: 6 dec, (1 sc, dec)*4 (14)
R 9-11: 14 sc (3 rows)
R 12: (5 sc, dec)*2 (12)
R 13: 12 sc
Leave thread for sewing. Stuff.
Legs (make 2)
R 1: 6 sc in MR
R 2: (inc)*6 (12)
R 3-5: 12 sc (3 rows)
R 6: (2 sc, dec)*3 (9)
R 7-10: 9 sc (4 rows)
Stuff.
Pull the opening, fasten thread and hide inside.
Arms (make 2)
R 1: 6 sc in MR
R 2: (1 sc, inc)*3 (9)
R 3-4: 9 sc (2 rows)
R 5: (1 sc, dec)*3 (6)
R 6-7: 6 sc (2 rows)
Stuff.
Pull the opening, fasten thread and hide inside.
Tail
R 1: 6 sc in MR
R 2: (inc)*6 (12)
R 3: 12 sc
R 4: (dec)*6 (6)
Leave thread for sewing. Stuff when sewing.
Assembly
1. Sew the ears on 2-4 rows on sides of the head.
2. Embroider nose between 9th and 10th rows, smile between 11th and 12th rows, and a vertical line between them.
3. Embroider/ glue/ sew eyes on 9th row, there are 5 sc between the eyes.
4. Sew the head to the body.
5. Attach legs using thread attaching (or sew) between 4th and 5th rows of the body on the sides.
6. Attach arms using thread attaching (or sew) 1 row below the seam between head and body.
7. Sew the tail on the back of the toy on about 5-6 rows.


