
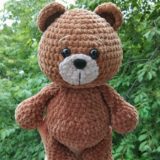
Little bear amigurumi

Designed and photos by Julia Deinega
Instagram: @deynega_yuly
Translated by Amiguroom Toys
Yarn: Velour YarnArt or Himalaya Dolphin baby and Alize Softy for a muzzle
Hook size: 4.5 mm for plush yarn and 2.5 mm for Alize Softy
Abbreviations:
R = row
mc = magic circle
ch = chain
sc = single crochet
st = stitch
inc = 2 sc in the next stitch
dec = single crochet 2 stitches together
( ) = number of stitches you should have at the end of the round/row
( )x6 = repeat whatever is between the brackets the number of times stated
Plush little bear amigurumi
free crochet pattern
 Head
Head
R 1. 2 ch, 6 sc in second ch from hook (6)
R 2. inc x6 (12)
R 3. (1 sc, inc)×6 (18)
R 4. (2 sc, inc)×6 (24)
R 5. (3 sc, inc)×6 (30)
R 6-9. 30 sc (4 rows)
R 10. (3 sc, dec)×6 (24)
R 11. (2 sc, dec)×6 (18)
R 12. (4 sc, dec)×3 (15)
Ears (make 2)
R 1. 2 ch, 6 sc in second ch from hook (6)
R 2. inc x6 (12)
Muzzle
Yarn Alize Softy and hook 2.5 mm
R 1. 2 ch, 6 sc in second ch from hook (6)
R 2. inc x6 (12)
R 3. (1 sc, inc)×6 (18)
R 4. (2 sc, inc)×6 (24)
R 5. 24 sc
Legs (make 2)
1. 2 ch, 6 sc in second ch from hook (6)
2. inc x6 (12)
3-4. 12 sc (2 rows)
5. (1 sc, dec)× 4 (8)
6-8. 8 sc (3 rows)
Fold top of leg flat and make ch, 4 sc through both sides across.
Arms (make 2)
R 1. 2 ch, 6 sc in second ch from hook (6)
R 2. (1 sc, inc)× 3 (9)
R 3-4. 9 sc (2 rows)
R 5. (1 sc, dec)×3 (6)
R 6-9. 6 sc (4 rows)
Fold top of arm flat and make ch, 3 sc through both sides across.
Body
R 1. 2 ch, 6 sc in second ch from hook (6)
R 2. inc x6 (12)
R 3. (1 sc, inc)×6 (18)
R 4. (2 sc, inc)×6 (24)
R 5-7. 24 sc (3 rows)
R 8. (2 sc, dec)×6 (18)
R 9-10. 18 sc (2 rows)
R 11. (4 sc, dec)×3 (15)
R 12. 15 sc


Pattern does not finish off and you have to apply for something else
Kathy, what do you need more for this pattern? There are ears, head, body, arms, legs and tail.
You need assembly instructions to finish it off, you end up with all the pieces but no idea where to connect them to create this adorable teddy
Use the picture of the completed bear to assemble, it’s easy enough to do!!
What u help where a head goes on a body and shere arms and legs go on and body and ears on a head is it not obvious or am I missing something
You say there are instructions for a tail. No, there isn’t one. Would be nice to get that but for now I’ll just try to figure it out on my own.
Bears dont have tails….🤐
technically they do :0
They have tails. A stubby one but they do have one..
IT DOES FINISH OFF….WHAT ARE YOU TALKING ABOUT!!!
It also has no stuffing instructions.
Why didn’t you include the instructions on how to put it together it would have been very helpful thank you for the patent
How can I buy this line? I’m from Brazil
eu compro pela aliexpress
Le orecchie mi sembrano incomplete
they are not incomplete, you have a flat piece that you just attach with 2-3 stitches 😉 it curles on its own
There is only the pattern, no finishing off instructions.
Diane, don’t wait so much from free patterns. To have a full amigururmi tutorial you can buy any pattern at Etsy.
I mean, it makes sense. It is a FREE pattern! the maker clearly put effort into it and it is still a nice pattern
Thank you for the pattern it’s super cute!
Also what hook size do you recommend?
bjr, adorable ces petits nounours,je craque tellement ils sont jolis.combien de hauteur font ils ?,svp.je prend votre modele avec plaisir ,je vais faire ces jolis nounours pour des bébés premas.je vous remercie pour ce modele gratuit mise a dispositoin de toutes (tous) les crocheteurs.
Adorable little bear. Assembly? No problem, head to body, arms to shoulders, legs to bottom of body, ears, nose to head. Simples
I agree Fran…. look at pictures and figure out what body parts goes where! LOL
The body ends at round 12, no hook size, no assembly, and bears do have short stumpy tails. But free is free and I get it, some people here are beginners and need it explained to complete, don’t bother saying free if it’s not complete with instructions.
What size hook is used?
It says 4. 5mm for velour.
Agree instructions are vague.
Are arms and legs and muzzle stuffed?
if you look on the back of your yarn it will tell you what size of needle is compatible with the yarn.
The instructions to the plush bear toy is misleading as the finished bear from your instructions doesn’t look close to your posted photos. I crochet more than hundreds of amigurumi but yours is most disappointing. Hope u will have the correct instructions to the plush bear toy
TAIL?where? I do not see it. please telle me it
R1. 2ch, 6sc 2nd ch from hook (6).
R2 (inc)×6 (12)
R3 (dec)×6 (6)
F. O.
That is for the tail.
Thank you finally someone can give us the tail
Amigurumi needs to be quite tight with normal yarn. So you use the hook to leave the least gaps. With this chenille yarn however you don’t have to use a greatly smaller hook as the fluffy yarn texture helps fill the gaps.
I am greatful to have access to a free pattern that is adorable. Those who are complaining must either be beginning or wanks. At no point does it say it is a Beginner pattern so therefore if you’re unsure on how to finish off your work I recommend using Google and or YouTube if the visible learning is better. You can also purchase the beginner version from etsy which include attatch ears to the upper left and right of head with the topat row 3and bottom at 5 the muzzle is attached to the bottom center of the head round 11 and the eyes go right above muzzle as close or further apart if that is that is the look you prefer the photo shows the head filled with stuffing and the muzzle, the arms and legs in picture look thinly stuffed which is adorable but that is another option which wld be based on personal choice. Thank you for the pattern, sorry that people forget to appreciate what they have a cute free pattern and others simply don’t know how to ask for help. I believe that the world is what it is ..If you want more information instead or criticism maybe say you would like to know how where they attached parts…you will find you have better luck getting the information that you want.
Nicely said. There is no reason to verbally abuse slow learners or perfectionists. So let’s all just try to play nice.
bjr, combien faut il de pelotes pour faire un nounours merci beaucoup
what size eyes was used for this pattern please?
absolutely adorable free pattern i used Bernat baby blanket and i am in love with this pattern very well written and easy to assemble by the pictures provided as well as just knowing where body parts belong. if your bear doesn’t look like the pic are you using the same type yarn because made with different yarn it will not look like the picture been there tried that lol. Love it and thank you so much for sharing it.
What size hook did you use?
Forget it, I must have missed the hook size. 4.5mm.
I also used bernat blanket yarn. Sewing it together now. Looking adorable.
For those of you complaining there’s no assembly instructions… If you’ve made amigurumi before, you really don’t need instructions.
If you haven’t, just look at the finished bear… Simple enough to count rows to figure it out.
As for the tail… Make a magic ring just like all the other pieces… Create a circle big enough to be a tail and attach it. 🙃
Yes I agree 100% with Cindy Franklin ! Thank you for taking out (your time )to give us this pattern Have a blessed day
Thanks for sharing it is so cute n pattern turned out adorable and well written
Sometimes I wonder why anyone would even bother to supply a free pattern when they get so many complaints. How about just saying thank you or paying for a pattern. I apologise for the rant.
I totally agree and I cant believe people are asking how to asemble it, if people don’t know on a bear where its body parts go they must gave serious problems because the kids I use to teach in nursery aged 3 knew where your head eyes ears arms legs etc were 🤣🤣🤣
concordo assolutamente
Love your pattern however just one question, how would you close off the neck at the body once stuffed?
i crochet the head and body in one piece,once your done with the body the end of head indicated in the pattern has same number of stitches on the body,so i just work from bottom of instruction up,if the pattern says decrease,you do increase (opposite)and you end up on number 1 of the head pattern. goodluck!
Didn’t think of it that way, how clever! I must try it! I hate sewing head to body because the neck is always floppy
Thanks again
for the tail: i make 3 chain on the 23rd stitch on row 5, slip stich on ch 1 and then continue Sc on 24th st. or you can make those chains for tail wherever you want the tail would be.
Wow thanks it’s work
I love it. Thank you for providing this for free.
Where do i put the eyes oil
on the head!!
Thank you SO much!!!!!!’🥰
I used size J hook and found it quite easily made and put together. Thank you for the free pattern.
It looks adorable. Thank you for the pattern. How big will it be when using Himalaya yarn?
Some of the comments on here made me laugh 😂 . Just starting this , Great idea Ana doing the body and head all in one . And a big thank you for the free pattern .
I love this little bear.
Used Bernat baby blanket and it came out perfectly with safety eyes and a safety nose.
Thank you so much!
It’s going to make lots of small children happy this Christmas.
Thank you!
I made this & it turned out cute. I used bernat velvet yarn with 4mm hook. My arms & legs looked different than the picture which made me question the pattern. I did add my own tail & it’s cute.
hermoso patrón, muchas gracias por tener ese espíritu desprendido y generoso para compartir estas bellezas
Cute. I have some plush yarn; I’m going to give it a try.
Thanks for sharing.
Hi everyone.
I sort of understand that a newbie to crochet and amigurumi would need a bit more help with putting the limbs onto the body. It’s frustrating to have to remove after it’s all sewn on. Pinning limbs on 1st is helpful but not always.
My wish is that the safety eyes had a designation in the pattern. We have all put them in only to see they aren’t correct/perfect. They cannot be removed once the head is closed.
Rudeness is unacceptable when commenting on a FREE pattern, but even more so when comments are directed to a crafter who obviously is a novice.
Darling pattern. Thanks for sharing. For others who may need more detail, I’ve rewritten with more specifics: Muzzle Use 4mm hook using alternate color of bulky yarn. Make a chain of 7 Rnd 1: begin in second ch: 5sc, 3sc in 1 loop, continue on the other side of the chain: 4sc, inc (14sc) Rnd 2: 1 ch, inc, 4 sc, (inc)repeat 3 times, 4 sc, (inc)repeat 2 times (20) (Optional) Rnd 3: 1 ch, inc, 5 sc, (1 sc, inc) repeat 4 times, 5 sc, inc (26). Insert safety nose or embroider nose.
Head R 1. Magic circle 6sc (6) R 2. inc x6 (12) R 3. (1 sc, inc)×6 (18) R 4. (2 sc, inc)×6 (24) R 5. (3 sc, inc)×6 (30) R 6-9. 30 sc (4 rows) R 10. (3 sc, dec)×6 (24) R 11. (2 sc, dec)×6 (18) R 12. (4 sc, dec)×3 (15) FO, leave tail for sewing on body (Insert eyes between rows 7/8) Stuff and shape head, attach muzzle and lightly stuff. With black yarn, sew mouth and eyebrows.
Ears (make 2) [attach over rows 2-5 of head] R 1. Magic circle 6sc (6) R 2. inc x6 (12) FO leave tail for sewing on head
Legs (make 2) 1. Magic circle 6sc 2. inc x6 (12) 3-4. 12 sc (2 rows) 5. (1sc, dec)× 4 (8) 6-8. 8sc (3 rows) Stuff then Fold top of leg flat and 4 sc through both sides across top. FO
Arms (make 2) R 1. Magic circle 6sc (6) R 2. (1 sc, inc)× 3 (9) R 3-4. 9 sc (2 rows) R 5. (1 sc, dec)×3 (6) R 6-9. 6 sc (4 rows) Stuff then Fold top of arm flat and make 3 sc through both sides across top.FO
Body R 1. Magic circle 6sc (6) R 2. inc x6 (12) R 3. (1 sc, inc)×6 (18) R 4. (2 sc, inc)×6 (24) Insert legs: 4sc, attach leg with 4sc, 8sc, attach leg with 4sc, 4 sc (24) R 5-7. 24 sc (3 rows). R 8. (2 sc, dec)×6 (18) R 9-10. 18 sc (2 rows) R 11. (4 sc, dec)×3 (15)
R 12. (Insert Arms) 2sc, attach arm with 3sc, 5sc, 3sc attach arm, 1sc (15) R 13. 15 sc FO
Tail
R1. Magic circle 6sc (6)
R2 (inc)×6 (12)
R3 (dec)×6 (6) FO, Leave tail for attaching
Come on people. Its for free.
Thank you for that lovely pattern. 😍
Rudeness is unacceptable, someone was just asking for a little help and pictures are not always very clear to see where to attach the other parts. Free doesn’t mean that all of the instructions do not have to be there. Especially If your new to crocheting.
did the bear up this evening, very cute. had no problem with pattern! thanks
VERY GOOD AND CUTE BEAT
What size eyes did you use and where to insert them?
Cute little bear but I found I had to adjust some of the rows. The muzzle needed to be made smaller and the body needed to be made bigger to match the photos. Assembly is pretty easy if you’ve crocheted amigurumi before but I wouldn’t recommend this pattern if you’re a beginner.
The proportions for this pattern are off. The muzzle is as big as the face.