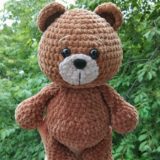
Tiny teddy bear crochet pattern

Designed and photos by Katerina Gushchina
Instagram: @katerina_gushchina_
Translated by Amiguroom Toys
Materials:
- Alize Bella yarn, 50 g/180 m (100% cotton)
- 1.5 mm crochet hook
- 2 mm glass beards for eyes
- Black embroidery floss
- Pink dry pastel crayon
- Sewing needle and scissors
- Fiberfill
Abbreviations:
R = row
mc = magic circle
ch = chain
sc = single crochet
inc = 2 sc in the next stitch
dec = single crochet 2 stitches together
F.o. = finish off
(12) = number of stitches you should have at the end of the round/row
( )*6 = repeat whatever is between the brackets the number of times stated
Crochet teddy bear free amigurumi pattern
Head
R 1: 6 sc in mc (6)
R 2: inc*6 (12)
R 3: (1 sc, inc)*6 (18)
R 4: (2 sc, inc)*6 (24)
R 5: (3 sc, inc)*6 (30)
R 6: (4 sc, inc)*6 (36)
R 7-12: 36 sc (6 rows)
R 13: (4 sc, dec)*6 (30)
R 14: (3 sc, dec)*6 (24)
R 15: (2 sc, dec)*6 (18)
R 16: (1 sc, dec)*6 (12)
R 17: dec*6 (6)
F.o.
Legs (make 2)
R 1: 6 sc in mc (6)
R 2: inc*6 (12)
R 3-5: 12 sc (3 rows)
Don’t cut the yarn when you will finish the second leg!
R 6: From second leg: 2 ch, join with the first leg, 12 sc on the firs leg, 2 ch, 12 sc on the second leg (28)
Continue crocheting the body in the round:
R 7-11: 28 sc (5 rows)
(1 sc, dec)*repeat to the end, closing the hole.
F.o. and leave a long tail for sewing.
Sew up the hole between legs.
Sew the feet together with some stitches. Arms (make 2)
R 1: 6 sc in mc (6)
R 2-6: 6 sc (5 rows)
F.o. and leave a long tail for sewing.
Ears (make 2)
R 1: 6 sc in mc (6)
R 2: 6 sc
F.o. and leave a long tail for sewing.
Bow
Make 4 ch.
R 1: From the 2nd ch from hook: 3 sc, 1 turning chain
R 2-5: 3 sc, 1 turning chain
R 6: 3 sc
F.o.
Wrap the middle of the bow with yarn a couple of times and sew to the head.
Embroider mouth, nose and eyebrows.
Tint cheeks using dry pastel crayon.


Quero aprender a fazer esses ursinhos, me manda a receita
cant print free pattern
cant i copy ..thank you very much
Use Ctrl + P, than you can copy from the opening window for printing.
Uh, did someone do a tutorial of this pattern? Because some parts are very vague and hard to understand.
What good is a free pattern if you can’t print it?
You can print it. Use Ctrl + P.
So cute. Thank you for sharing.
Thk you so much for sharing! What a cute little bear! You are very smart to work out this pattern.
Thanks so much for this excellent pattern- have just made a panda version and it’s adorable!
The pattern doesn’t explain how to attach the head to the body. I would have thought the body would have been a continuation of the head.
This is an incredibly cute pattern. I can’t wait to get started with it. Thanks for sharing
Thank you so much for sharing your sweet pattern, I can’t wait to try it out. I had no problem printing it out. Merry Christmas and a happy, healthy new year.xx
What row do we put the safety eyes?thank you
The eyes look like they are placed in the widest rows, somewhere between rows 7 and 12. I guess it depends on what kind of look you want.
did you ever figure this out?
Alguien por favor me explica cómo es la segunda para y el cuerpo no lo puedo entender y no me está quedando.