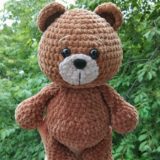
Amigurumi bear in sweater

Designed and photos by Tanya Ershova (vk.com/club_kotoklubok)
Instagram: @kotoklubok
Translated by Amiguroom Toys
Abbreviations:
R = row
mc = magic circle
ch = chain
sc = single crochet
DC = double crochet
inc = 2 sc in the next stitch
dec = single crochet 2 stitches together
BLO = back loop only
FLO = front loop only
F.o. = finish off
(12) = number of stitches you should have at the end of the round/row
(…) *6 = repeat whatever is between the brackets the number of times stated
Crochet bear free amigurumi pattern

Legs (make 2)
With white colour:
R 1: 6 sc in mc (6)
R 2: inc*6 (12)
R 3: (1 sc, inc)*6 (18)
R 4-9: 18 sc (6 rows)
Don’t cut the yarn when you will finish the second leg!
From second leg: 3 ch, join the first leg.
Continue crocheting in the round:
Body
R 10: 18 sc on the first leg, sc in 3 ch, 18 sc on the second leg, sc in 3 ch (opposite side) (42)
R 11: (6 sc, inc)*6 (48)
R 12-15: 48 sc (4 rows)
With sweater colour:
R 16-26: 48 sc (11 rows)
R 27: (14 sc, dec)*3 (45)
R 28-32: 45 sc (5 rows)
R 33: (13 sc, dec)*3 (42)
R 34-43: 42 sc (10 rows)
R 44: (12 sc, dec)*3 (39)
R 45-47: 39 sc (3 rows)
R 48: (11 sc, dec)*3 (36)
R 49: BLO: 36 sc
F.o., leaving a long tail for sewing.
Head
With white colour:
R 1: 6 sc in mc (6)
R 2: inc*6 (12)
R 3: (1 sc, inc)*6 (18)
R 4: 18 sc
R 5: (2 sc, inc)*6 (24)
R 6: 24 sc
R 7: (3 sc, inc)*6 (30)
R 8-9: 30 sc (2 rows)
R 10: (9 sc, inc)*3 (33)
R 11: (10 sc, inc)*3 (36)
R 12-21: 36 sc (10 rows)
F.o.
Arms (make 2)
With white colour:
R 1: 6 sc in mc (6)
R 2: inc*6 (12)
R 3: (3 sc, inc)*3 раза (15)
R 4-5: 15 sc (2 rows)
With sweater colour:
R 6-34: 15 sc (29 rows)
R 35: (3 sc, dec)*3 (12)
Stuff gently.
Fold top of arm flat and sc through both sides across.
F.o., leaving a long tail for sewing.
Сollar
Go to the R 49: FLO: 36 DC
F.o.
Ears (make 2)
With white colour:
R 1: 6 sc in mc (6)
R 2: (1 sc, inc)*3 (9)
R 3: (2 sc, inc)*3 (12)
R 4: (3 sc, inc)*3 (15)
R 5: 15 sc
Fold top of ear flat and sc through both sides across.

Muzzle
With white colour:
Don’t use a marker for R 1-3 (every row will be longer).
Make 5 ch
R 1: From the 2nd ch from hook: 4 sc in next 4 st, inc, inc, 2 sc in next 2 st, inc (10)
R 2: 3 sc in one st, 4 sc in next 4 st, inc, 3 sc in one st, 5 sc in next 5 st, inc (16)
R 3: inc, 7 sc in next 7 st, inc, inc, 7 sc in next 7 st, inc, 1 sc (20)
R 4-5: 20 sc (2 rows)
F.o., leaving a long tail for sewing.


I have been crocheting for many years and can figure this out but I have to say I’m a little disappointed at the incomplete assembly instructions for this very adorable bear.
I think that there’s a mistake in the muzzle. number of stiches doesn’t add up. However i’m making second bear this yaer. It’s cute 🙂
Paulina, there is no mistake in the muzzle, Don’t count stitches as usually and don’t use the stitch marker, crochet how it is written.
I just finished a bear following this pattern and I love him so much! It’s a shame that I cannot post a picture because he it so CUTE <3 Thanks for sharing your pattern!
Crochet pattern Bear in a Sweater. I’m curious on how you attached the head. I tried sewing through the back loop of the collar, I’m ok with it but would welcome another option.
Imade this and crocheted the head directly onto the body. If you work the head portion backwards and do decreases where it says increase it works out perfectly and no sewing!!!
I am unsure how to attach the head to the collar. There are no instructions, or pictures to help. Please post directions or a picture showing yhe attachment
Absolutely love this guy but the same as others… trying to attach the head without instructions… thought my crochet skill where intermediate but still struggling. I would be happy to pay for a complete instruction print out. Failing that I am grateful for the tip from Michele to work backwards with the head instructions.
Angie Again. I had a better look at the collar section. i think you would pick up the front loops from the body and DC around the neck join??? just a thought
Hola, me encanto el paso a paso. Puede resolver todo, lo que no estaba use mi experiencia. Muy bello el modelo. Siempre quise hacerlo al fin encontré el patrón. Muchas gracias.